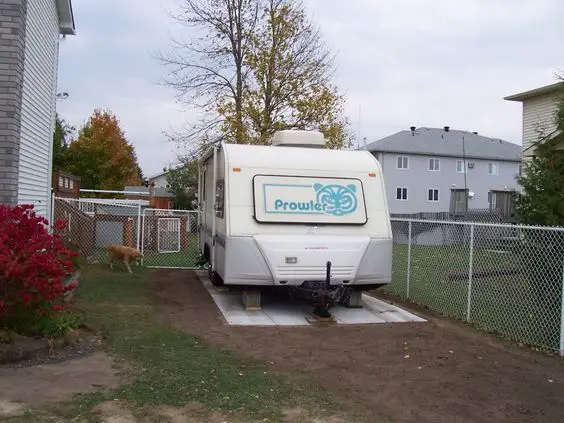
5 RV Parking Pad Ideas: Create the Perfect Spot for Your RV
Looking for some Rv parking pad ideas? It’s more important than you think as it will give your RV solid grounding especially over the winter when it’s likely parked up for months on end.
But of course an RV parking pad isn’t the first thing that springs to mind when you’re planning all these incredible places you want to visit. But, along with all the breathtaking and picturesque destinations, you have to consider the terrain you’ll be parking your trailer or RV on, so considering a good quality camper pad is essential.
Finding a proper place to park is often a real challenge for many. Some parking surfaces are more suitable than others, and it’s usually difficult to know which surface provides the best foundation for your RV.
To help you find the best place, we’ve put together some ideas for RV parking pads for you. As well as these, we’ve also included the types of materials you should use, and also a ‘Dos and Don’ts’ section just so you don’t make the same mistake ass many before you.
We’ve also included a ‘How to Build Your Own Gravel parking Pad’. It’s not as difficult as it seems and anyone can do it. There’s also an FAQ section for everything RV parking Pads, just so you shoulc be well equipped by the time you’ve read this post. Happy reading!
RV Parking Pad Ideas
1. Permeable Parking Pads Are Inexpensive and Anyone Can Lay them

The innovative design of permeable pavers, as depicted in the picture above, provides a DIY solution for any individual. These paving systems are porous, letting water move through and descend into the ground or the sub-base rock below.
They match the resilience and strength of conventional paving materials like asphalt, compacted gravel, and concrete.In today’s market, a variety of porous paving grids are accessible.
These range from interlocking concrete grids, permeable concrete, asphalt pavements, to plastic grid pavers with flexible joints and the rigid or rolled plastic pavers featured in the image above.Much like a strategy from James Bond‘s playbook, permeable pavers offer a covert solution to impervious cover code restrictions.
These are designed to minimize flooding risks, protect natural waterways, and regulate stormwater runoff. Such pavers are perfect for constructing eco-friendly parking lots, fire lanes, driveways, industrial zones, and roadways that absorb and contain water, preventing flooding.

The rolled plastic grid system conforms seamlessly to the landscape, ensuring no potholes or cracks form over time. This system not only promises optimal gravel or soil retention but also unparalleled permeability. Its design facilitates easy shipping and storage due to its rollable nature.
While primarily designed for foot traffic and light load applications, the installation does necessitate staking, slightly influencing the overall cost.
Permeable pavers are cheaper compared to other traditional materials. Plastic rollout systems and plastic grid pavers with flexible joints are both less costly and easier to maintain compared to other traditional systems.
These pavers cost approximately $4 to $6 per square-foot, with the price varying according to the availability of materials. Meanwhile, an average-sized permeable driveway, along with its installation, will cost around $5000 or more.
2. Vapor Barrier and Leveling Blocks Make for a Budget Camper Pad
Parking pads can be expensive and many people can’t afford the outlay, so a cheaper way to do it is using some vapor barrier among other things will keep your RV off the dirt.
Along with killing off the grass, parking your RV in the moisture-laden dirt can significantly damage your tires. Grass is also a pest attractant and can result in bugs and other creepy-crawlers climbing into the RV and building nests. Vapor barriers, leveling blocks, and tire covers can all help protect your investment and make a relatively cheap parking pad for your RV.
Dirt and grass also retain water, so exposing the RV’s tires to moisture for extended periods of time can increase dry rot, shortening the lifespan of your tires and negatively affecting your expensive investment. However, if you do decide to park in the grass, it is advisable to add a vapor barrier between the ground and the tires, as shown in the picture above.
It’s almost impossible to bring a concrete pad along with you on an RV trip, but leveling blocks are another excellent alternative.
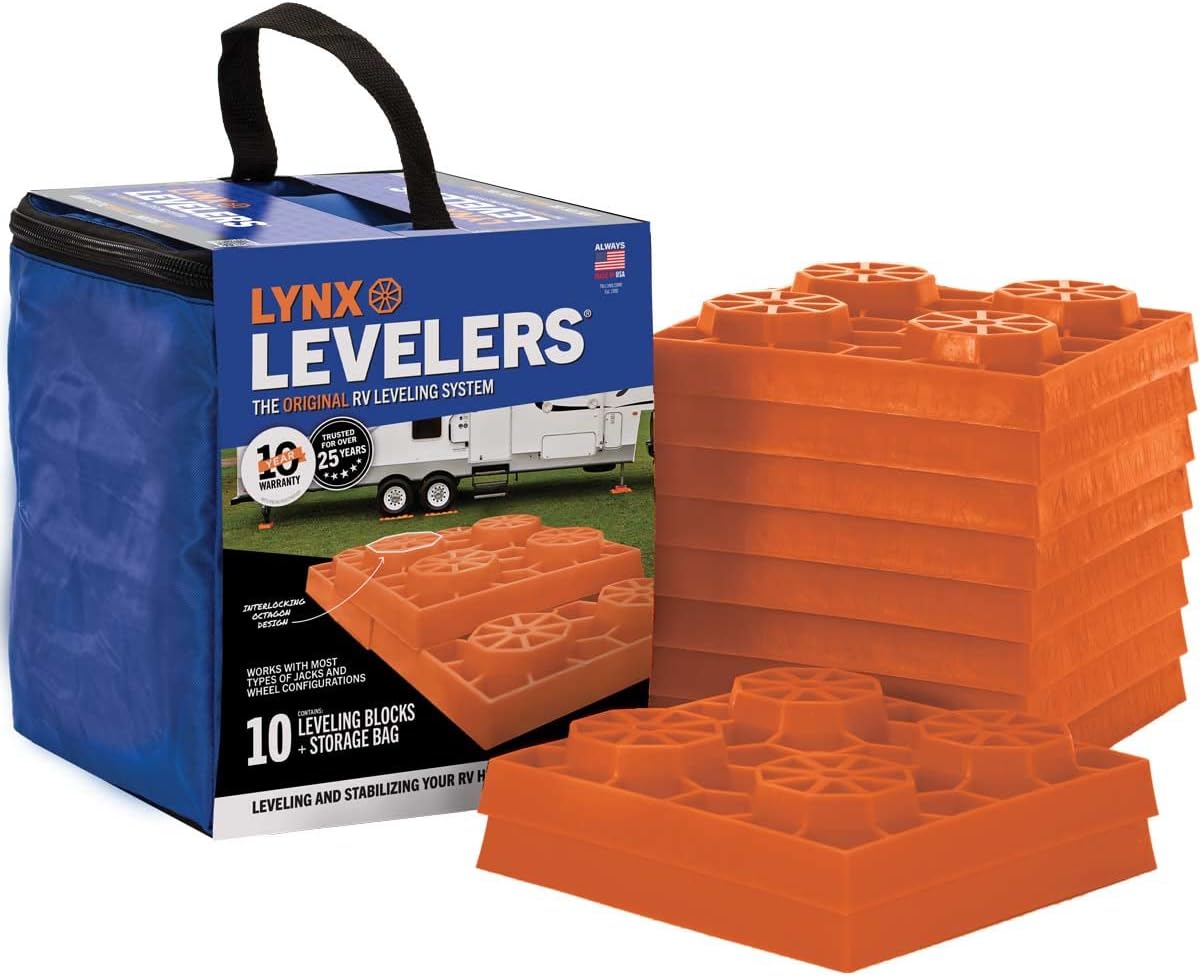
Wood or any other leveling block can easily be placed beneath the RV’s tires to disperse the weight of the vehicle on the grass or any soft surface. RV-specialty vapor barriers can cost around $0.50 to $0.75 per square-foot, while leveling blocks have a price ranging from $30 to $50.
Both objects can easily be purchased online. Another cost-effective way to put a barrier in place is to purchase a simple plastic cutting board or a cutting mat. Just make sure that the entire area which comes in contact with the parking surface is covered by the vapor barrier.
You can also protect your tires from moisture and sun exposure by using tire covers. If you don’t have tire covers, you can wrap a tarp around the tire and keep it in place using a bungee cord.
3. Gravel is a Great Surface for a Parking Pad

Another cost-effective way to create an RV parking pad is to put down a plot of crushed rock or gravel, similar to the picture above. Both materials allow water to drain and dissipate, making them a lot more tire-friendly. However, determining the thickness of the gravel pad is often a difficult task.
It usually depends on the conditions of the soil on which you plan to park the RV. In some types of soil, you can simply put down gravel, and it will last you for many years, whereas in other areas, the gravel can be swallowed up by the earth in just a short period of time.
You can construct a gravel pad yourself or hire a professional to get the job done. To build your own gravel camper pad, however, you’ll need to dig and remove about six to eight inches of soil. Large base stones or L-sized stones should then be installed in the bottom to a depth of four to six inches for strength.
After compacting the area, finish the pad with regular-sized gravel or choker angular gravel. It’s also advisable to talk to individuals who have gravel driveways, so you can learn from their experiences.
Gravel is cheaper than concrete and allows better water drainage and runoff. A single camper pad measures about 18×9 feet and the cost of one spot of gravel with a depth of three inches is approximately $60. If you do decide to build a gravel parking pad, it’s still advisable to put a vapor barrier between the ground and the tires.
4. Are Concrete Parking Pads Really No Good?

Concrete RV parking pads divide opinion, with some loving them and others vehemently against them. However, if you do it right, you can make a great, permanent parking pad for your RV.
The problem with concrete layered parking pads is that there’s no drainage, and if your tires are submerged in water for a long period you could damage them. But there are ways around the drainage issue, of course.
You could ensure the concrete parking pad levels down from one side or from the middle, like our roads are. In this way, it will ensure any excess water drain immediately to the sides of the parking pad and that there’d be no long standing water for your RV tires to have to sit in.
Doing this of course, you’d need to have drainage at the side to soak up the excess water, but it makes a concrete parking pad ok in our opinion.
The only thing we don’t like about them is that they’re more expensive than gravel, as you’d probably need to get a professional to come an install it. But, it’s much more permanent than the other cheaper options above, and it should always be considered.
5. Interlocking Concrete Blocks Make for Great Parking Pads
")
If you’re really determined to go for concrete, you could go for something classier, more permeable, and much more expensive too. Interlocking concrete blocks make for excellent parking pads, if you get the right blocks!
Firstly, be aware that not all driveway blocks can handle all the weight of an RV, so always do you due diligence before buying some, because they can break and they start to lose their appeal as soon as you start to see a few broken blocks.
This type of parking pad should be installed by a professional, so as well as the materials costing more, the whole job will cost quite a bit more than the other parking pad ideas.
That said, if you intend to create an RV parking pad at the side of your home, this type of driveway would add more value to your home. But more importantly, because of the permeability of the camper pad, your RV would be well protected.
This is because the water will drain quickly into the interlocking blocks, which usually have sand to absorb the water. This is definitely the most expensive camper pad on our list, but it certainly does the job well. That said, if you’re not building the parking pad at your home, it’s probably not worth the investment as the other RV parking pads will do the job just as well.
Considerations for RV Parking Pads
If you own a recreational vehicle, you would know the struggles one has to face when looking for an area to park and store their RV. And if you decide to store your vehicle at a commercial facility during the offseason, you should know it can be expensive, especially if you require indoor or heated storage options. The best solution is to build a parking space for your RV and use your own camper pad. Here are some benefits and drawbacks:
Build a Parking Space at Home
If you’re at home and don’t have plans to travel in the near future, then you will have to park your RV. With parking pads, you can build a parking space yourself at home. You can remove your RV tires to prevent them from getting damaged due to staying in one position on a hard surface.
Moreover, since you can build a parking space at home, you can save the money you’d have to spend at a commercial storage facility. And, if you choose the right one, parking pads can actually help make your driveway look stylish an dadd value to your home.
You Might Break The Law
Before you install a camper pad at home, contact your homeowner association to see whether or not you’re allowed to do so. You need to check that you’re not breaking any zoning laws and that you don’t require a permit to do so. Moreover, you need to make sure that you opt for the right kind of parking pad, as a wrong decision on your part can lead to your RV tires getting damaged
What Size RV Parking Pad Do I Need?
Before you decide to make a parking space for your RV, you must know the size of the camper pad you’ll need. To get the right size, first, measure the length of your RV to see how much space it requires. Most RVs vary in length, they are mostly about eight to ten feet wide so they can fit within the standard driving lanes that are about 12 feet in width. So note your RVs length and width and consider the space that other equipment, like mirrors and ladders, needs.
Once you’re sure of the area your RV will take up, see that you have enough space on either side so that you can easily park and pull it out. Parking pads also vary in length, and range from 20 to 45 feet in length and about 10 to 12 feet in width, so choose the size that suits your requirements.
Types of Camper Pads
If you’re planning on setting up these camper pads yourself, then there are a few things you should know beforehand. The most important thing to know is the different types of parking pads that you can use to build an effective place to park your RV. Some common types include:
Grass Protection Mesh
Grass protection mesh is made using two co-extruded polymers, which are combined to form a mesh grid that you can directly roll over any grass area. This mesh is designed to distribute the weight of the vehicle so that it preserves the roots of the grass and also prevents any rust from forming.
This mesh provides you with additional traction as it features cross extruded polymers that allow it to lay flat on the ground. Although this option is both cost-effective and offers easy installation, if you’re going to leave your RV parked on the mesh for a long period, your tires being exposed to wet grass could cause damage, so this isn’t the best of parking pad ideas.
Grass Pavers
Grass pavers are more stable and are water-permeable, which makes them a more permanent solution. They are basically plastic rolls made using recycled plastic. They have a honeycomb-styled grid that features a quick-connect interlocking construction that allows it to be quickly installed and doesn’t require any special clips to join the rolls together.
In order to install these camper pads, you must remove all the existing grass, and will have to add and compact about four inches of crushed rock. Then roll these pavers over the gravel and fill them up with soil or sand. You can then either seed the area or even better stick with sand as it will be just as permeable as brass and soil, but also not as damaging to your tires.
EGA Ground Grid
EGA Ground Grid units are a great option for you to consider if you want to create a gravel RV Parking pad that offers you stability. Although you can use them for both gravel and grass infills, they are more suitable for gravel areas that use an angular rock infill. This grid features flexible cells that can both open up and restrict the lateral movement of these infills and help create a strong, compacted parking area.
Moreover, you won’t need any aggregate base underneath the grid either, as you have to place it over a geotextile fabric instead. This reduces the cost of the material, labor, and installation. EGA Geocells are a more efficient solution for sloped or inclined areas. These enable drainage downhill and provide the stabilization you require for a camper pad.
Dos and Don’ts of RV Parking Pads
Parking your RV on the grass seems like the easiest and the cheapest option, however, it has a few drawbacks. You not only kill the grass, but the moisture present on the grass can cause damage to your tires, so you’ll basically be dry-rotting your recreational vehicle’s tires.
Moreover, parking on the grass will lead to pest infiltration, so you most definitely need parking pads. However, before you use them, you should be well aware of some dos and don’ts.
Let’s start with some dos of these parking pads:
Do Use Gravel
Gravel and crushed rock are tire-friendly as they allow the water to dissipate, hence you should consider a gravel padding for your RV. However, sometimes you just don’t know how thick your gravel pad should be.
Many times, you’re working with different types, in such cases, putting down the gravel is a great option as this padding lasts you a long time. Meanwhile, some soil swallows up the entire gravel padding. So, you need to gravel on top of larger stones to offset that issue. Use L-sized stones for the bottom bit and once compacted, top it off with regular-sized gravel, this way, your gravel padding won’t sink into the soil.
Do Try Concrete Pavers
When padding a parking space for your RV, you might think of using regular pavers, however, a better idea would be to swap out these regular pavers with concrete ones. Layered concrete does the job if you have the correct drainage, but even better if you get interlocking pavers. Using interlocking concrete pavers are much more permeable and as long as you get the right ones, they make for a perfect RV parking pad.
Do Use a Vapor Barrier
In case you have an asphalt padding, you need to be careful since direct contact with the asphalt surface can damage tires severely. To prevent this direct contact, you need to use vapor barriers. However, if you’re looking for a cost-effective method, then simply buy a simple plastic cutting board or take a cutting mat, and make sure that you park your RV on top of this barrier only.
Now let’s talk about some don’ts:
Don’t Use Pavers For Paving
Pavers tend to be an attractive option, and you can easily use them if you’re planning on doing the entire parking space yourself. However, the main concern is that these pavers aren’t that tough and are unable to stand the weight of many RVs, which leads to the cracking or breaking.
Don’t Use Asphalt
Although the asphalt parking surface looks good, the main issue is that the oil present in asphalt causes severe damage to these tires. Moreover, if you’re in a humid, hot area, then the asphalt surface will leave an impression on your tires that will not fade away easily.
Don’t Use Poured Concrete Slabs for Your Camper Pad
A lot of people wonder whether you can use these slabs for padding. One thing that you should know is that poured concrete slabs are similar to gravel and concrete pads. They don’t consist of any petroleum product, which means that they can be used for padding parking areas as they do not damage the tires.
However, with these slabs, the water doesn’t flow through, therefore, when designing the pad, make sure the design features a slight crown at the center. This will allow the water to roll off the pad and prevent it from pooling.
How to Build a Gravel RV Parking Pad
Gravel padding is a great option for your parking area. If you want to build a gravel RV parking pad, you need to know the steps you’ll have to follow to ensure that you do the right job. Have a look:
-
Firstly, remove the grass.
-
The next step is the paver edging. For that, you need to get the border.
-
Then put the weed mats in but first spray the area with grass and weed killer.
-
Once you’ve gotten all the landscaping material down, see that you’ve staked it down properly.
-
Take the crushed concrete and pour it all across the area and spread it out well.
In case you’re still confused about the steps mentioned above, and you still have some questions, then you can go through the video below.
People Also Ask – Parking Pad Ideas FAQs
If you’re thinking of having a parking area made, you need to be well aware of the parking pads that are suitable for your RVs. Since the market is filled with multiple options. You might still be confused about certain things. Therefore, we answered some of the most asked questions regarding these RV parking pads. Hopefully, these will answer some of your queries.
What is the Best Surface to Park an RV on?
The most suitable surface to park your RV on is concrete. Opting for concrete padding is an ideal option as it is a lot stronger. However, it is a lot more expensive.
Other alternatives include crushed gravel and mined rock padding, or you can opt for asphalt padding. However, for the latter, you will need to make sure that you use a vapor barrier to prevent your tires from getting damaged.
How Thick Should an RV Pad Be?
No matter which surface padding you’re opting for, the pad’s thickness isn’t that important. What’s more important is the mix that you’re using for it and the type of soil you’re dealing with. You need to use the right amount of mix. Be specific about the type of material you want so that you get the appropriate amount.
Should RV Tires Be Off Ground When Parked?
This depends on how long you are planning on having your RV parked. If you’re parking the RV for a short period of time, it is better that you don’t take the tires off.
However, if you’re planning on parking the vehicle for an extended period of time, you will have to take it out for a spin every now and then to prevent flat spots. Alternatively, you can use the jacks to lift the tires slightly off the ground to prevent damage to the tires. Covering them also protects against damage from the outside elements.
Can I Park My RV in My Yard?
Parking your RV in your yard is probably the most convenient and affordable option. You can use your driveway or your yard. However, you must make sure that you are legally allowed to do so. Also, ensure that you do not cause your neighbors any issue with your RV, it shouldn’t block the sunlight or the sidewalk, etc.
Parking Pad Ideas – Creating The Perfect Spot for Your RV
A parking pad is essential for anyone storing their RV away for several months. It will protect your tires and underbelly from any possible damage and also give you a firm platform to drive on and off.
Of course, there are several considerations, such as the climate, your budget and space you have. But once taken all things into consideration, any of the parking pad ideas above will do the job optimally.
Some are more permanent than other, but they will all protect your vehicle when you need it to, saving you money in the long run. Most of them can be done by any willing DIYer, but the interlocking parking pad, should definitely be done by a professional. After all, it’s a big outlay and a professional finish will also add value to your home.
Whichever camper pad you go for, we’re sure you’ll be happy you did. Happy camping and see you next time!
Other RV Related Buyer Guides
Here are a few other RV-Related guides to set you in the right direction:
- Best Wheel Chocks to Help You Stay Put
- Make Your Wheels Thief-Proof With the Best Trailer Wheel Locks
- Locked Up Like Fort Knox-Best Security Systems to Keep Your Family and RV Safe

Hello, fellow wanderers! I’m Alyssia. Since 2008, my husband and I have called an RV our home, journeying through life one mile at a time. Our nomadic lifestyle has led us to over 70 countries, each with their unique tales that have shaped our own.
I share our stories and insights right here, hoping to inspire and guide you in your own adventures. Expect tips on RV living, our favorite camping spots, breathtaking hiking trails, and the joys and challenges of an ever-changing view from our window. Alongside, you’ll also find practical advice on outdoorsy stuff, designed to equip you for any journey. Join us as we continue to explore the vast, beautiful world on wheels!